


Search This Site
Search With Google
How To Change A Primer Bulb
One of the most common repairs that you will carry out on your petrol strimmer is that of replacing the primer bulb. The petrol strimmer is usually powered by a 2 stroke engine which will employ a primer bulb system for cold starting. When it comes to cold starting a petrol strimmer, the process will prove to be extremely difficult without a fresh squirt of fuel in the carburetor. And for this reason alone the primer bulb is often neglected and under appreciated until the user discovers it to be cracked or broken and cannot use it in cold starting. The primer bulb is a very useful and important part of your petrol strimmer and must be well kept, monitored and changed when required. Primer bulbs are usually made out of rubber or plastic and this is why they are susceptible to wear and tear and breaking. If you own a petrol strimmer or any other similar powered tool, it is fair to say that you must expect your primer bulb to wear out. You can of course take your strimmer to a professional to have the primer bulb changed, but in our opinion that is a waste of money as changing the primer bulb is a very simple process. Once you have done it once, it will be like second nature to you.
Moisture Meter Guide 2010 Contact details:garnett65@hotmail.com

The complete moisture meter website
Moisture Meter Guide
Wagner Moisture Meters
General Tools MMD5NP Pinless LCD
General Tools MMD7003 Precision
General Tools MMD8P Multi Species
General Tools MM700D Precision
Boat Moisture Meter
A moisture meter proves itself to be a useful tool when testing the moisture content levels of boat materials. When assessing a boat, care, judgement and experience should all be employed and then the moisture meter used as the last tool to give the final assessment. Boat moisture detecting meter
Need A Chainsaw For Firewood?
The petrol chainsaw is used to fell trees, as well as for pruning and cutting overgrowth. Tree surgeons favour the petrol chainsaw and use it for cutting away branches and foliage. Logs for firewood
Orchid Moisture Meter
The orchid belongs to a widespread and very diverse family of flowering plants which have fragrant and colourful blooms. Orchids can be found in pretty much every habitat. Plant moisture detector
Caravan Moisture Meter
Any caravan that is kept open to the elements all year round can become very susceptible to damp and damp related problems if proper precautions are not taken to prevent this. Moisture in caravans

Garden Moisture Meter
The garden moisture meter helps any avid gardener to measure and monitor many different conditions to ensure that they can maintain healthy growing conditions for both indoor as well as outdoor plants. In order to have healthy thriving plants Soil moisture meter review

Times To Change The Primer Bulb
When the primer bulb is cracked or worn it is time to replace it. Wear and tear is the most contributing factor to changing the primer bulb, but there are other reasons and times that changing the primer bulb are a good idea. Even if the primer bulb has not worn out yet.
Changing Fuel Lines
Fuel lines on your petrol strimmer are made out of plastic as well. These fuel lines can wear and crack in time with age and wear. So if you are changing the strimmer fuel lines you should really change the primer bulb at the same time. The fuel lines will be the same age as the primer bulb and if they have begun to crack and wear out, it is pretty likely that the primer bulb will follow shortly. So when you order new fuel lines for your petrol strimmer, it just makes sense to order a primer bulb as well. The expense is minimal and you are already working on that area of the strimmer. The last thing you want to happen is that you replace the fuel lines and a short time after the primer bulb goes. This means that you will have to go to work again on the same vicinity.
Cleaning The Carburetor
The carburetor on the petrol strimmer requires cleaning on a fairly regular basis to ensure optimum performance. The primer bulb is usually located near and in many cases on the actual carburetor. So when you dismantle the carburetor and clean it, complete the job thoroughly by replacing the primer bulb.
Primer Bulbs On The Carburetor
Primer bulbs will differ in their mounting designs depending upon the petrol strimmer that you have and the particular model and brand. However even with these slight differences in mounting design, changing a primer bulb is very similar on every model. There are steps which apply to every model and if you can successfully change a primer bulb on one model, you will definitely be able to change a primer bulb on a different model. The fundamentals are the same.
Now on many small engine petrol strimmers the primer bulb is mounted directly on to the carburetor and the way to replace it is listed below in convenient to follow steps.
1 -
2 -
3 -
4 -
5 -
6 -
7 -
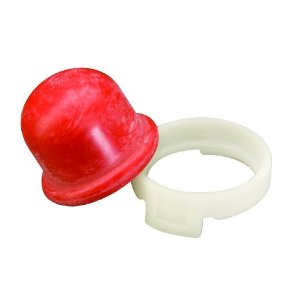
Remote Primer Bulbs
There are many petrol strimmers where the primer bulb is mounted separately from the carburetor. These particular primer bulbs will use a snap and ring system to secure them in place. It doesn’t matter on the brand and model of petrol strimmer you have, all remote primer bulbs will be changed in the same way. To change this type of primer bulb just follow the easy to follow steps below.
1 -
2 -
3 -
4 -
5 -
| Tramex Moisture Encounter Plus |
| Tramex Compact Wood Moisture Meter |
| Tramex Concrete Encounter Moisture Meter |
| Tramex Skipper Plus Moisture Meter |
| Tramex Roof And Wall Moisture Scanner |
| Sonin Digital Moisture Meter model 50218 |
| Sonin Digital Moisture Meter 270 model 50270 |
| Sonin Moisture Test Tool model 50210 |
| Sonin Moisture Test Meter Model 50211 |
| Oak |
| Douglas Fir |
| Beech Tree |
| Elm Tree |
| Hickory Tree |
| Maple Tree |
| Pine Tree |
| Prevent And Repair Gaps In Wooden Floorboards |
| How To Fix A Squeaky Hardwood Floor |
| How To Repair A Hardwood Floor That Has Buckled |
| Which Is The Best Firewood? |
| Concrete |
| Concrete Moisture |
| Screed Moisture Meter |
| SDS Drill |
| Belle Cement Mixer |
| SDS Drill Advice |
| Which SDS Drill |
| SDS Drill Accessories |
| Drilling Into Concrete |
| Kennedy Tool Box |
| Moisture - Basic Facts |
| Types Of Damp |
| Wet Rot |
| Dry Rot |
| Mold |
| Water Leak Detection |
| Stucco Moisture |
| Water Damage |
| Moisture And Rust |
| Moisture Damage To A Chimney |
| Wallpaper Stripper |
| Plaster Mixer |
| Why Worry About Moisture Problems |
| Does Your Home Have A Moisture Problem? |
| How To Solve Moisture Problems |
| How To Use Anti Mold Paint |
| Rising Damp |
| Condensation |
| Salt Damp |
| How To Avoid Bathroom Condensation |
| How To Remove Black Mold |
| How To Prevent Bathroom Mold |
| Soldering Kit |
| Soldering Kit Contents |
| Soldering Kit Advice |
| Bonsai Tree Classification |
| Growing Bonsai From Seed |
| Bonsai Tree Care |
| Bonsai Tree Training |
| Bonsai Tools |
| Displaying Bonsai |
| Bonsai Calendar |
| Bonsai Plants |
| The Thirsty Light Curve Moisture Meter |
| The Thirsty Light Ladybird Moisture Meter |
| The Thirsty Light Bumble Bee Moisture Meter |
| The Thirsty Light Butterfly Moisture Meter |
| Hanna Instruments |
| Agratronix Portable Coffee Moisture Tester |
| Lawn Aerator |
| Lawn Roller |
| Lawn Rake |
| Lawn Sand |
| Chainshot |
| Chainsaw Gloves |
| Chainsaw Trousers |
| Chainsaw Boots |
| Mac 4 - 20 XT Chainsaw |
| Mac 738 Chainsaw |
| Mac 842 Chainsaw |
| Mac 20X Power Chainsaw |
| Einhell BG-PC 3735 Chainsaw |
| Einhell BG-PC 4040 Chainsaw |
| Einhell BG-PC 5045 Chainsaw |
| Poulan P3314 Chainsaw |
| Poulan P4018 Chainsaw |
| Poulan Pro PP3816AV Chainsaw |
| Poulan Pro PP4218AVX Chainsaw |
| Poulan Pro PP4620AVX Chainsaw |
| Efco MT 4100 SP Chainsaw |
| Efco MT 3500 Chainsaw |
| Efco 132 S Chainsaw |
| Efco 147 Chainsaw |
| Efco 152 Chainsaw |
| Efco MT 7200 Chainsaw |
| Efco MT 8200 Chainsaw |
| Efco MT 3750 Chainsaw |
| Methods Of Obtaining Soil Moisture Levels |
| Hygrometer |
| Psychrometer |
| Rain Gauge |
| Wave Ventilation System |
| Humidity |
| Hygrometer For Keeping Reptiles |
| Humidor |
| Weather Stations |
| Musical Instrument Storage |