
Search This Site
Search With Google
Soldering Kit Advice
Thirsty Light Garden Moisture Meters
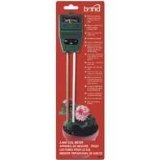
Sometimes when you go out shopping you just happen to come across something that really appeals due to its simplicity and novelty Plant meter
Moisture Meter Guide
The complete moisture meter website
Soldering
Soldering can be performed using hand tools to do one joint at a time or on a production line doing numerous joints at the same time. But it is hand soldering that we will concentrate on. To hand solder the main tool is the solder iron or the soldering gun. No matter what is being soldered there are basic steps that have to be followed to ensure a successful solder. These steps are cleaning the metal joints that are to be joined, fitting up the joint, heating the parts to be joined, applying flux, applying the particular filler you decide to use, removing the heat from the join and keeping the assembly still until the filler has solidified and depending upon which type of flux that you have used there may be after cleaning required.
Hand soldering or silver soldering as it can be referred to at times is a kind of brazing because you use materials that have melting points around or above 450 degrees. This soldering is intended to give a nice looking and very solid joint, especially in jewelry making.
Moisture Meter Guide 2010 Contact details:garnett65@hotmail.com
The Orchid Moisture Meter
The orchid belongs to a widespread and very diverse family of flowering plants which have fragrant and colourful blooms. Orchids can be found in pretty much every habitat. Healthy orchids

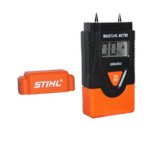
Firewood Moisture Meter
The Stihl moisture meter can be used to detect and give a moisture reading level in firewood. This is important if you have a log burning fire or stove. It is essential that you only burn well seasoned wood. As well as being able to detect the moisture levels in firewood the Stihl moisture meter can be used on both paper and cardboard as well.
Hydroponic Moisture Meter
Hydroponics is a way of growing plants in water, using mineral nutrient solutions and no soil. Terrestrial plants can be grown using such mediums as gravel, mineral wool, expanded clay and rock wool. Hydroponics

Soldering Advice
?
4-
When the component lead and board are heated you can apply your solder from the soldering kit. Take your solder and touch the tip of it to the component lead and solder pad, but avoid touching the solder iron tip at this time. If the heating has been successful, the solder should melt and flow freely around the pad and lead. You will also observe the flux melt liquefy as well. It should also bubble and give of a small amount of smoke. Keep adding solder until the pad is completely coated and a small mound is formed by the solder. If you end up with a ball up effect then you have used too much solder or the board is simply not hot enough. After the soldering is complete, remove the solder iron and allow everything to cool. During the cooling process do not move the joint at all. Always remember to follow the safety tips when soldering.
5-
After soldering you must check the joint to make sure that it is done properly. If so and you do not need to do it again then simply trim the lead with a small pair of cutters and cut the top of the solder joint. Clean off any excess flux residue with a rag and methyl hydrate then blow dry the board and your job is complete.
Soldering A Wire Joint
Another very common use for the solder iron and soldering kit is that of soldering 2 wires together and once again this is not too difficult a process to carry out by yourself. The wires can be in your home, on electrical appliances or on your car.
1-
The wires that you want to join together will be protected and covered by a heat shrink tubing. So before soldering the wires together you need to remove the protecting tubing. You do this using some stripping pliers and take about an inch of the tubing from either end of the wires.
2-
The next step is then to join the two wires together. This is because it is necessary to have a strong mechanical connection between the wires. So take the wires and twist them together. To get the strongest possible join hold the wires together in an X shape with their middles crossing one another. Then just simply twist one of the wires along the other wire’s length. Repeat the process on the other side so that you have a match. The result will be a strong joint that will not be much thicker than the existing wire itself.
3-
Take your solder iron and heat up the bottom of the joint with the thicker section of the soldering tip. By using the thicker section more heat will be conducted in to the wire joint. The thicker the wire joint, the more heat will be required. Do not overheat the joint as quite a bit could actually melt off.
4-
When you have fully heated the wire joint you can then apply the solder just above the soldering tip. If this solder does not melt immediately then you know that you require more heat. When it melts the solder will flow in to the wire joint. At the same time you should be moving the tip of the solder iron along the wire joint. You need to add solder until the joint is fully covered and there are no signs of the copper wire to the eye.
Induction soldering is a process that is very similar indeed to brazing. Here the heat source is induction heating by a high AC current in a copper coil. What is special about induction soldering is that the copper rings can be made to fit the part that is needed to be soldered. This ensures a more precise job.
Not all metals are the same and some are more easier to solder than others using a soldering kit. Copper, silver and gold are very easy to solder. Both steel and nickel are difficult to solder whereas both stainless steel and aluminium are extremely difficult to solder.
Soldering Tips
Before you actually begin to solder using your solder iron or soldering kit there are a few steps of preparation that need to be performed.
1-
2-
3-
4-
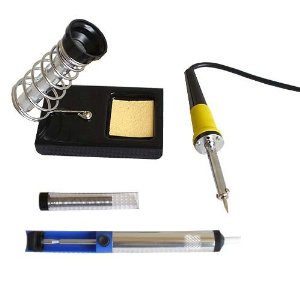
Soldering Kit
Each soldering kit is put together for specific and different applications. However the majority of soldering kits will contain the basic fundamental tools.
Anything you are not sure about soldering just check out the advice page.
Electronic Component Soldering
The soldering of electronic components is the most common form of DIY soldering. Doing this is quite easy but you still need skill and practice to ensure that you are up to doing a good and suitable job. When it comes to soldering components on to a circuit board you need to clean the circuit board, place the components in the exact position and then solder the joint.
1-
In order to achieve a strong and low resistance joint it is imperative that you work with a clean surface. So clean all the surfaces that you wish to solder thoroughly. You can use something like a 3M scotch Brite pad to remove any surface tarnish without scratching. Your aim here is to clean the board down to the shiny copper. Acetone can also be used to remove any chemical contamination that you may discover. Once cleaned, dry the board and remove any debris that may of built up in any holes and give a final wipe with a clean cloth.
2-
After cleaning the components and board, place the components on the board in the correct position. You will find that you need to solder a few components at a time before turning the board over and soldering more components. The trick with this type of soldering is to begin with the smallest components first, working your way up to the bigger components. By doing this you will keep the board relatively flat and much easier to work with.
3-
You need a tiny amount of solder on your solder iron tip. Then lay the tip of the iron so that it comes to rest against both the component lead and the board. You need to ensure that you heat both because if you don’t the solder will simply pool and not stick to an unheated item. After a couple of seconds the joint should be hot enough to solder.
5-
You need to clean off the flux because it can be corrosive to the wire. A cloth and methyl hydrate are used to do this properly
6-
When you have successfully soldered the two wires together you need to insulate the join. Get yourself some heat shrink tubing, cut it to the correct length for coverage and then place it over the joint. Heat this tubing with a lighter until it shrinks and tightly covers the joint.
How To Solder Galvanized Steel
Galvanized steel is steel which has been galvanized in order to prevent corrosion. Because it has this protection, galvanized steel can pose problems when it comes to soldering. As long as you follow the proper procedures though, soldering galvanized steel can be done successfully.
First of all you need to prepare the surface properly. You do this with a piece of sandpaper and smooth the metal where you wish to solder it. The sandpaper will remove all the inconsistencies from the surface of the metal that will prevent your solder from bonding to it.
After sanding, take a cloth and degreaser and wipe the metal over the area that you have sanded. This will remove any dirt and grease from the steel as well as taking away any dust created from the sanding.
The next step is to rub the clean and sanded area of the steel with a liquid flux. By doing this with the liquid flux you will make it easier to attach solder to the metal. What the liquid flux does is to create a conductive surface for the solder.
Heat up your soldering tool to the hottest setting possible and hold it’s tip against a piece of acid core solder. You need to turn the tip slowly so that you coat the entire tip in a thin film of solder.
Apply the soldering tool tip to the galvanized steel in the place where you wish to add the solder. Continue doing this and run the tip along the whole area that you wish to solder.
It is worth checking the tip of your soldering tool after this process to ensure that there are not any pieces of metal or debris stuck to the tip. If there is anything stuck to the tip then rub it against some steel wool to remove the debris.
Flux needs to be applied to the galvanized steel at the same time as you solder. The reason for this is to ensure that you get the proper adhesion required. The metal should be lightly wet all the time you are working on it.
After every pass with your soldering tool you must wipe the soldered area with an abrasive cloth. This cloth will remove any excess acid that can be formed from the solder.
How To Solder Brass Tubing
Brass tubing is used quite universally in a variety of applications. It can be used in arts and crafts, jewellery making and tool making. So knowing how to solder brass is a useful thing to know. You can create you own “solid” brass posts just using brass tubing at a fraction of the cost for example. When you know how to solder brass tubing you will be able to apply this knowledge to making almost anything you want out of brass.
First of all you need to prepare the surfaces of the brass tubing for soldering. You do this with an abrasive pad and then clean the edges with acetone. After cleaning with the acetone, rinse the edges with cold water.
When the brass tube edges are clean you have to then coat them with flux.
The next step is to place the brass tubing on a soldering pad to support it and arrange the tubing exactly how you want to solder it. Remember to ensure that the tubes are flush to one another as solder does not fill any gaps.
At the position where you wish to solder, place a small amount of solder and then heat the brass tubing with your soldering tool until the solder flows.
Finally check the seam that you have soldered to ensure that you have done a good job. If so proceed and turn the tubing over and repeat the procedure until the whole tube is joined.
How To Solder Copper Tubing
Knowing how to solder copper tubing is very useful and could save you buckets of money over the long run. For home repairs and home restoration copper tubing has a habit of showing it’s head and needs to be worked with.
To solder copper tubing you first need to take the copper tubing and cut it to the required length. You do this with a tube cutter by making a turn with the cutter and then adjusting it a size down and making another turn. Keep repeating this process until you have cut the copper tube.
With sandpaper you must remove any rough edges and burrs from the edges of the copper tubing until smooth.
Take your flux and apply it to both pieces of copper tubing that you plan to solder. Remember that it is only the inside of the larger tube and the outer of the smaller tube that needs to be coated with the flux. Ensure the flux layer is thin and even. Connect the two tubes that are to be soldered.
Fire up your soldering tool until hot. You want a strong blue frame. Move this flame around the connected part of the tubes and heat evenly.
Once the pipes are heated thoroughly you can use your solder.
Take your solder and touch it to the joint of the copper tubing. Because the tubing is hot the solder should be drawn to the joint. Keep your flame heating the copper tubing at the opposite side to which you are applying the solder.
Once you have applied the solder and believe you have made a good joint, allow the tubing to cool down and then test it for movement.
How To Solder Wrought Iron
Soldering wrought iron can prove to be difficult to do at times. Usually one is limited to making small surface repairs and sealing leaks with wrought iron.
Before working with the wrought iron you need to tin the tip of your soldering iron. You do this by heating the soldering iron up and applying a thin coat of solder to the tip to give you a balance of heating and oxidation.
Take a wet sponge and clean the wrought iron of any dirt and debris. Then with the sponge clean the tip of the soldering iron so that it is literally dripping. Quickly run the tip of the soldering iron through the sponge just before you make the joint.
Once the wrought iron has be fully prepped coat the area with a thin layer of solder.
Take the wrought iron and secure it properly in a soldering stand to prevent it from moving whilst you perform the soldering.
Heat up your soldering iron and apply a small amount of solder to the tip and then push the tip against a piece of solder to heat it up.
Take the heated piece of solder and place it on the area of wrought iron that you wish to solder. Slide the solder in to the joint between your 2 pieces of wrought iron. Do not bump or shake the joint.
Soldering Safety Tips
The main constituent of any soldering kit is the solder iron. Now for many people the soldering iron is just an every day tool that they use for a variety of applications. There are even some people out there who would go as far as to say that the soldering iron is indispensable. The solder iron can be used to melt and weld different metals together using a filler metal such as solder. As agile and versatile as the soldering iron is and despite it’s small size, using it can still be a dangerous experience if proper safety precautions are not adhered to. It is well worth remembering that a tip of a soldering iron has the capabilities of reaching temperatures as high as 700 degrees f. This temperature is more than hot enough to seriously injure a person or inflict damage on any properties that are within close proximity. So when using the soldering iron from your soldering kit it is always advisable to adhere to the correct safety precautions.
Soldering Smoke
So you have purchased yourself a soldering kit and wish to use it. The first thing that you need to do is find yourself a well ventilated area or room in which to solder in. When using and heating up solder you will notice that there is smoke given off.This smoke can be very irritating to your lungs and mucus membranes. The smoke or fumes is not pleasant and you should definitely not breathe in the smoke. A well ventilated room or area will help disperse this smoke. One tip to help you avoid breathing in the smoke is to tilt your head to the side when you are actually soldering and not place your head directly over the work you are doing with your soldering kit. Wearing a protective mask of some sort is also a good way to prevent smoke inhalation.
Stable Working Surface
When soldering with your soldering kit it is best that you actually work off a surface that is stable. Something like a stable work bench or table is suitable. If you are performing mobile soldering such as working underneath a car then you must have a fire resistant surface directly under the work. You can use plasterboard or a specially designed solder mat for this particular job. The idea behind having a fire resistant surface under your work is to prevent the possibility of any mishaps such as burning the carpet, melting plastic or even marking woodwork.
Power Overload
When you have unpacked all of your soldering kit and are ready to begin work then ensure that you do not overload the outlet where you plug your soldering iron in. If you already have a couple of appliances already feeding off that particular outlet it is recommended that you unplug the appliances that you are not directly using. This way you will not overload the socket and blow a fuse. If it is not possible to unplug all the appliances you can always try to find yourself another socket in which to plug in the solder iron.
Always Be Aware
Now when using the solder iron from your soldering kit it is such a simple thing to do to just place it down on any surface that you are working on. This is not carelessness but a pretty natural thing to do actually. But you have to try and program yourself not to do this. By placing the hot solder iron down on a surface risks seriously damaging that surface and other objects nearby. It can also damage the tip of the soldering iron itself. So never use a soldering iron without having a specially made solder iron stand for the solder iron to sit in when not being directly used. Depending upon the standard of soldering kit that you have a solder iron stand may be already included. If not, then you need to purchase a solder iron stand separately and add it to your soldering kit.
Power Cord
A soldering kit may be quite expensive to buy because it has all the equipment you require to perform soldering. However a soldering iron on it’s own is not very expensive to buy. So if you discover that the electrical cord becomes frayed or even exposed, then rather than try to repair it just purchase a new solder iron. If the soldering iron in your soldering kit is an expensive version then seek professional help with the repairs. A DIY repair could lead to problems and definitive safety issues. The last thing you want when you sit down to solder is to receive an electric shock.
Working Gloves
When you buy yourself a soldering kit it is a good idea to purchase yourself a pair of heat resistant gloves as well. Along with a pair of needle nose pliers for gripping objects, you will be protecting your hands from any burns from the soldering iron. Most items that you solder will be small and delicate. This means that they will be difficult to hold and if you are not wearing gloves or using the pliers you can so easily burn your fingers. And believe me this is a very painful experience that you do not want to experience on a regular basis.
Keeping Organized
When you have finished working with a soldering kit always unplug it from the power source. If you are working and someone requires your attention never leave the working area without unplugging the iron before doing so. An unattended soldering iron at full heat is an accident waiting to happen especially if you have inquisitive children in the vicinity.
Wash Hands
When you have finished working with your soldering kit always pack it away properly and keep it clean and organised for the next use. Solder has lead as one of it’s constituents so always wash your hands thoroughly as well. Lead is toxic if you ingest it and it can be absorbed by the skin.
The soldering kit has many uses and is an excellent tool to have. Providing you follow all the proper safety precautions the soldering kit will prove to be a safe and very valuable tool for you to own. And remember to always apply tip care to your soldering iron.
Soldering Iron Tip Care
Most soldering iron tips today have a copper core that is surrounded by an iron coating. This where the term iron cladding comes from. Theses soldering iron tips are nickel or chrome plated. The reason for this is that solder will not stick to either chrome or nickel so the plating end of the solder tip is removed so as to expose the iron cladding. Iron is also another substance that solder will not stick to. To prevent a soldering iron tip from rusting you need to keep the tip covered in a layer of tin. There is a process for doing this which is called tinning. Tinning will ensure that you always receive maximum heat to the tip of your soldering iron.
To ensure that you receive maximum use from your solder iron in your soldering kit you need to take care of it's tip properly. Solder iron tip maintenance is very simple to do and by doing it you will extend the life and improve the working life of your soldering iron.
Any good quality soldering kit will contain spare solder iron tips for you to use in case the original tip malfunctions. However if you take good care of a tip you will not need to replace tips on a frequent basis.
So to protect your tip there are a couple of pointers you should adhere to. When soldering you want to be using the highest quality solder that you can find and afford. When you buy a soldering kit, solder will be apart of this kit. However you need to check the solder out to make sure that it is of good quality. If it is poor quality then you need to upgrade it. The reason that you need to use high quality solder is the fact that impurities in solder can build up on the solder iron tip making it difficult to solder properly. Any impurities on the tip will also affect the heat distribution.
It is imperative that you always keep the tip clean. To do this you can wipe the tip with a damp sponge. The way to know that the tip is clean is that it will be both shiny and bright. There are also metal mesh pads that you can buy to keep a soldering iron tip clean. The main reason for keeping a tip clean is to ensure maximum heat distribution.
But with cleaning the tip constantly you need to be aware that constant cleaning with a damp sponge can actually lead to tip failure. The reason for this is because of rises and falls in tip temperature due to the damp sponge. What happens is with temperature rises and falls the metal layers of tip are subjected to pressures from expanding and contracting.
This is how metal fatigue is caused and the tip will just simply collapse and be unusable. So take note that the more frequently you wipe the tip, the more stress you apply to it and shorten the life.
Flux
Flux is rumoured by many to be able to clean a soldering iron tip. But this is not so. Flux has corrosive abilities and can actually wear your tip out. Sandpaper and other similar abrasive materials are also advised as methods of cleaning a soldering iron tip. But just like flux, these do have the affect of wearing the tip out. So both should be avoided.
However eventually, not matter which method you use, the tip will inevitably wear out and need replacing. So the best method of tip care is just minimal tip cleaning and this is where using a high quality solder will assist you greatly. The higher the quality of solder, the less cleaning you will be required to perform. Solder with a high tin content and high metal purity is the way to go. So choose your solder wisely. A high quality soldering kit should make this easier for you with a high quality solder already included in it’s contents.
Cleaning Routine
There is a routine you can get into that will help with the maintenance of your soldering iron tip. It is recommended that after each session you work with the tool you wipe the tip clean and then flood the tip with high quality solder. You then wipe off this solder and finally turn off the solder iron. By doing this the result is that you have flushed and then re tinned the tip. By doing this you are assisting in the prevention of oxidation and corrosion, both processes which will ruin any solder iron tip.
Solder Iron Tip Seizing
Some time you will experience the tip seizing. This is where the tip becomes stuck
in the barrel of the tool. To rectify this is quite simple enough to do. All you
need do is loosen the screw that secures the tip to the barrel. If you are planning
on storing your solder iron for a while and have no intention of using it for a period
of time, you should always loosen the tip with this process before doing so. The
problem of having a seized tip can lead to the risk of damaging the heating element
while you try to un-
Blackened Solder Iron Tip
Another result of using a solder iron is that the tip can become blackened. Using a damp sponge to clean this will not work. Using something like a tinning block or a brass brush should bear dividends and rectify the matter. A tinning block is used by first placing a small amount of flux on it and then rubbing the tip of the soldering iron in it. Just wipe clean afterwards with a damp sponge to remove any remaining debris. You may find that you need to repeat this process several times in order to have a perfectly clean tip. If you use the brass brush method to remove the blackening then always remember to re tin the tip again with the process as mentioned earlier.
So by taking care of the soldering iron tip with this simple methods, you will not only prolong the working life of the tip, but has have a better working experience. Some soldering kits out there on the market place today are very basic with their contents. However a high quality soldering kit will not only contain all the soldering tools you require, but also all the components that you require to maintain your soldering iron tip. Such items as re tinning gear and brass brushes can of course be purchased separately, but if you are out to buy a soldering kit, make life simpler, and buy a high quality soldering kit with everything you require included in it’s contents.
Care For The Solder Iron
Whether you be using the solder iron or not, you should always place it in a stable iron stand.
Always plug the solder iron in to the correct type of mains.
Using an extension cord is something you should try to avoid. However if you must use an extension cord then ensure that it is a heavy duty one.
The cord to your solder iron should be inspected on a regular basis to check for any burns or cracks. If cracks or burns are found then seek professional help to repair or replace.
When in use always make sure that the power cord is not hanging in such a way as that it can be pulled off the table you are using.
Try to never drop or bang the solder iron as ceramic heaters are very easy to crack or even break.
When not using the solder iron do not allow it to idle at the operating temperature for any long period of time. If you do then you run the risk of burning out the element or even the solder iron itself. Always turn down the temperature or even switch off.
Once in a while remove the tip and tap the barrel of the solder iron to loosen and remove any debris.
When storing your solder iron for an extended period of time place it in a zipper type of bag to protect it from any moisture which can cause corrosion. Humidity can also be a problem for the solder iron and for any other equipment you have in your soldering kit.
| Tramex Moisture Encounter Plus |
| Tramex Compact Wood Moisture Meter |
| Tramex Concrete Encounter Moisture Meter |
| Tramex Skipper Plus Moisture Meter |
| Tramex Roof And Wall Moisture Scanner |
| Sonin Digital Moisture Meter model 50218 |
| Sonin Digital Moisture Meter 270 model 50270 |
| Sonin Moisture Test Tool model 50210 |
| Sonin Moisture Test Meter Model 50211 |
| Oak |
| Douglas Fir |
| Beech Tree |
| Elm Tree |
| Hickory Tree |
| Maple Tree |
| Pine Tree |
| Prevent And Repair Gaps In Wooden Floorboards |
| How To Fix A Squeaky Hardwood Floor |
| How To Repair A Hardwood Floor That Has Buckled |
| Which Is The Best Firewood? |
| Concrete |
| Concrete Moisture |
| Screed Moisture Meter |
| SDS Drill |
| Belle Cement Mixer |
| SDS Drill Advice |
| Which SDS Drill |
| SDS Drill Accessories |
| Drilling Into Concrete |
| Kennedy Tool Box |
| Moisture - Basic Facts |
| Types Of Damp |
| Wet Rot |
| Dry Rot |
| Mold |
| Water Leak Detection |
| Stucco Moisture |
| Water Damage |
| Moisture And Rust |
| Moisture Damage To A Chimney |
| Wallpaper Stripper |
| Plaster Mixer |
| Why Worry About Moisture Problems |
| Does Your Home Have A Moisture Problem? |
| How To Solve Moisture Problems |
| How To Use Anti Mold Paint |
| Rising Damp |
| Condensation |
| Salt Damp |
| How To Avoid Bathroom Condensation |
| How To Remove Black Mold |
| How To Prevent Bathroom Mold |
| Soldering Kit |
| Soldering Kit Contents |
| Soldering Kit Advice |
| Bonsai Tree Classification |
| Growing Bonsai From Seed |
| Bonsai Tree Care |
| Bonsai Tree Training |
| Bonsai Tools |
| Displaying Bonsai |
| Bonsai Calendar |
| Bonsai Plants |
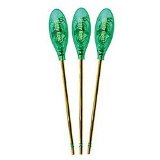
| The Thirsty Light Curve Moisture Meter |
| The Thirsty Light Ladybird Moisture Meter |
| The Thirsty Light Bumble Bee Moisture Meter |
| The Thirsty Light Butterfly Moisture Meter |
| Hanna Instruments |
| Agratronix Portable Coffee Moisture Tester |
| Lawn Aerator |
| Lawn Roller |
| Lawn Rake |
| Lawn Sand |
| Chainshot |
| Chainsaw Gloves |
| Chainsaw Trousers |
| Chainsaw Boots |
| Mac 4 - 20 XT Chainsaw |
| Mac 738 Chainsaw |
| Mac 842 Chainsaw |
| Mac 20X Power Chainsaw |
| Einhell BG-PC 3735 Chainsaw |
| Einhell BG-PC 4040 Chainsaw |
| Einhell BG-PC 5045 Chainsaw |
| Poulan P3314 Chainsaw |
| Poulan P4018 Chainsaw |
| Poulan Pro PP3816AV Chainsaw |
| Poulan Pro PP4218AVX Chainsaw |
| Poulan Pro PP4620AVX Chainsaw |
| Efco MT 4100 SP Chainsaw |
| Efco MT 3500 Chainsaw |
| Efco 132 S Chainsaw |
| Efco 147 Chainsaw |
| Efco 152 Chainsaw |
| Efco MT 7200 Chainsaw |
| Efco MT 8200 Chainsaw |
| Efco MT 3750 Chainsaw |
| Methods Of Obtaining Soil Moisture Levels |
| Hygrometer |
| Psychrometer |
| Rain Gauge |
| Wave Ventilation System |
| Humidity |
| Hygrometer For Keeping Reptiles |
| Humidor |
| Weather Stations |
| Musical Instrument Storage |